Thursday, January 31, 2008

Slogging Through It.

Phew! What a week (or two). Busy at work and never at home. I still found some time to paint up a bit more of my first platoon; the "Airlanding Battery, Royal Artillery".

I had finished painting the smocks on all the minis so I moved onto the camoflauge stripes. I did the minis in batches. First I mixed up some brown paint which was mostly "Scorched Brown" and a little "Elf Flesh" to lighten the colour. Using my thinest brush (I am in need of new ones with better tips!) I painted wiggly lines all over the smocks.

I painted more lines with a mix of 3:2:1 "Goblin Green", "Dark Angels Green" and "Scorched Brown". This gave me a more military green which blended in nicely.

With most of the painting out of the way I started to work on the plastic bases. In order to get a natural look to the bases (which are flat and untextured) plaster and "static grass" will be applied. I'll detail this process in a future article. For now I will need to prepare the bases so that the glue and plaster will have something to adhere to. To this end I have taken a blade and scored the tops of the bases.
The miniatures are then glued to the bases. Here is the command team for the platoon. The officer is directing two of his guardsmen. The arrangement on the miniatures is quite plain, but I plan to be a bit more creative with future bases. For now I am content with just getting the platoon finished.
Below is a picture of a pair of gun teams ready for basing. The howitzers are not yet glued on. If I did glue the guns in place the wheels would appear to be below ground (note the extra height provided by the miniatures base). I'll glue the guns on later as the plaster is drying.
A tutorial for basing Flames of War figures can be found at: http://www.flamesofwar.com/Default.aspx?tabid=110&kb_cat_id=29

Sunday, January 20, 2008

Trial and Error

I had some time over the week to paint up a few more minis. I don't have the recommended colours from the "D minus 1" book I was using as a reference so I'll have to mix the colours myself. First a picture of the full platoon before painting.


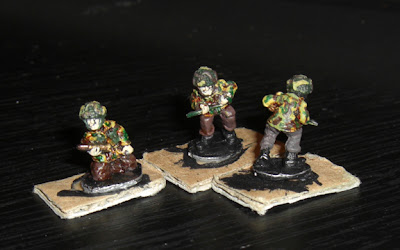
I have used the trio of figures at the furthest guns as experiments for mixing colours and camouflage. They came out a bit bright. Although those figures are far ahead of the others in the painting process I used the same steps I described below.

To get a good base for the crew's uniform I painted a darker brown. In the Vallejo paint range the colour is "English Uniform". Since I only have Citadel paints I found a mix of "Scorched Brown" and "Elf Flesh" in a 2:1 ratio worked. 
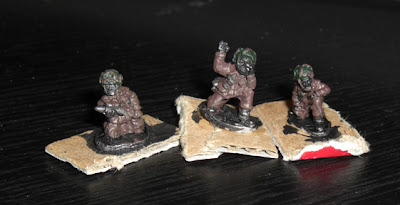
For the Dennison Smocks (basically the jacket) I originlly used Citadel paint's "Bubonic Brown", but that came out too bright. Again mix of "Vomit Brown" and "Dark Angels Green" gave me the colour I wanted. The ration is 4:1 or more. Always remeber to add the darker colour to the lighter (the Green to the Brown in this case) as it takes less of the darker colour to change the lighter than vice versa.

In the picture above some of the darker brown is showing through. This is ok for the recessed areas. Another thin layer of paint will make the yellow colour solid. Try not to go into all the crevices and avoid thick layers at all costs. The dark brown colour is supposed to show through in the recesses giving the impression of depth. This is a case of "Do as I say not as I do" as I have obviously failed to take my own advice. To try and correct the problem I have used a wash on the figure to the extreme left. It's a bit shiny. I am hoping the camoflauge layers will help tone it down.

The same yellow mix colour used on the smock can be used on half the strips of the helmet. The other half being painted "Scorched Brown" or the brown mix used on the pants. You may find it easier to paint all the strips brown first so that the yellow colour has a good base (yellow tends to look green on a black basecoat I don't know why.

Here are some of the experimentation figures from the big picture. They are a bit bright for my liking which is why I went with a darker yellow.

Monday, January 7, 2008

Fanning the Flames of War

In December I spent much more time then I care to admit ogling the minis from Flames of War, the semi-historical World War Two game. Finally I broke down and bought a few miniatures. Now I am waiting for the rest of my order to arrive. I often get asked about how I paint such small miniatures. It actually is not very difficult at all. I will chronicle the painting of my British Airborne army.

So what do the figures look like? Well here is a picture of a single 15mm soldier next to a dime.

Four or five of these miniatures will be placed on a stand to represent a team of soldiers. Note the strand of metal connected to the bottom. This is called flashing and is waste material, cut it off with a pair of clippers or a hobby knife.

Choosing a force and learning the game is a few pages by itself and better left to the folks on the Yahoo Group FoWOntario or the Flames of War forums or better yet your Local Game Store (LGS). Best thing to do is pick a force you will enjoy learning about and that you think looks good. In my case I choose the dead-hard British Paratroopers, bonus is the Canadians of the 1st Canadian Parachute Battalion took part on D-Day which means I can field a Canadian force.

Before painting the first thing to do is get some picture references of the real life figures. We are looking for the colours of uniform, equipment, gear and identification. I found a good number of pictures on the Internet for pictures of British Paratroopers. I also hit the local library to pick up books on the Canadian army during the war era. Also helpful is a reference section of one of the rule books (Flames of war: D minus 1), it even notes the differences in the Canadian uniforms (which had a slightly greener hue).

Now, that we have a reference we can collect the correct paints and some brushes. As well as a jar of water to rinse the brushes while we are working and a paper towel to absorb excess water and paint. For brushes I use Citadel brand sizes fine and standard (available from http://www.games-workshop.com/) or Winsor and Newton size 0, 00 or 000 (not sure where to get it from). Sable brushes are the best don't bother with the synthetics. For paints I use Citadel colours, but Vallejo is good and there are many brands of water based acrylic paints. Just be sure to stay away from enamels.
Now lets get back to the miniatures. The first platoon I am going to paint is my Airlanding Battery, 4 howitzers, its crew and command teams. I'll show the process for two guns, the other guns will be similarly done.


I carefully remove the flashing and other unwanted metal being sure I don't scratch details on the miniature. Then I stick the crew, using white glue, to pieces of card so I can handle the figures without touching the miniature and rubbing off paint with my fingers.


Using slightly watered down black paint I paint over the entire miniature, creating an undercoat for later layers to stick to. I try to get into all the nooks and crannies but I am careful not to put the paint on to thick. You can see a spot I missed on one of the crewman to the left of the front gun. Oops, I'll fix that on the next go. I paint in an assembly line so that (hopefully) the paint is dry on the first figure by the time I have finished the last. It is best to let the paint dry before putting on the next colour as wet paint mixes!


Time for some camouflage. The Dark Angels Green paint I had was a bit too cartoony, being meant for science fiction warriors. I mixed a small amount of some Scorched Brown paint on my pallette to get a more realistic colour. Both howitzers and all the helmets were painted with this colour.


To get a nice even colour I painted in two light coats. This is better than a single heavy coat as the paint dries evenly and does not get "chunky". As you can see the gun is pretty bland in a single colour. I am going to create the illusion of depth by highlighting raised parts on the gun with a lighter colour. I added some Goblin Green to the mix I had previously and used a technique called dry brushing to get just the raised bits. Here is a comparison: the gun in the foreground has been highlighted, the other one is just flat colour.


There are two tricks to dry brushing. First you need to wipe the brush on a paper towel until the lines of colour are very faint and second, contrary to the name, the brush has to be a little damp to avoid the paint drying out too much and leaving a "dusty" effect all over the miniature. To apply the highlights lightly drag the brush over the miniature. All the raised portions will rub against the brush and the small amount of remaining paint will stick to the miniature. The amount of pressure is directly proprtional to the amount of paint remaining. Don't push to hard though or the lower layers could be scratched off.

I spent the rest of the night just experimenting with colours since I don't have the exact colours that the Flames of War source book calls for. Here are the results of the gun crew's pants.